
I am not sure how I came across Waffle Sewing Patterns, Pinterest perhaps? or maybe while I was trolling Etsy looking for sewing inspiration? Anyway, I came across the Duffle Coat and decided that it had everything I wanted in a spring jacket. It had a loose, A-line shape with a hood and pockets. Sold! So I went to Jo-Ann's to find fabric. I was browsing through the bottom weight fabrics and found this teal cotton with 3% spandex. Having a stretch cotton probably wasn't the best choice, but this coat used up nearly three yards of interfacing along most of the seams, so they are not stretching anywhere.

This was my first time sewing a coat and overall it went pretty well. There is some funny business going on, such as I sewed the toggles slightly askew so it pulls the front up a bit, when I was attaching the lining something stretched a bit somewhere leading to some bunching on the inside corner, and my first welt pockets are not even but they are serviceable. I am treating this coat as a wearable muslin.

I cut a straight size 36 and it fits overall. I wish I had lengthened it for my long torso by a couple of inches, but there were not lengthen/shorten lines on the crazy pattern piece. The coat is essentially one pattern piece that is both the front and back, with no side seam, so I wasn't sure how to extend it without skewing something. I'll investigate that further if I make this coat again.

The instructions included with this pattern were fantastic. They are illustrated clearly and all the steps are very nicely explained. I was able to do my first welt pockets relatively painlessly with the very detailed instructions. There was also a reminder at each step you needed to press and provided instructions for finishing the main seams with a faux flat felling. The multi-sizing on this pattern was also great. It is set up so each size is a different layer in Adobe Reader and you only need to print off the size(s) you desire. Very clever. I would buy another pattern from this company! The pockets are placed pretty much where a side seam would be and I find them too far back. Instead of being able to easily put my hands in the pockets, I have to search for them and it bothers me. I would move them forward just an inch or so.

My colour pallet does not normally include teal, but I just kept coming back to this fabric when I was at the store and I decided that it was meant to be. I'm still a bit iffy about this colour as a coat, but stay tuned for the pants I made from the leftover fabric because they are fantastic.
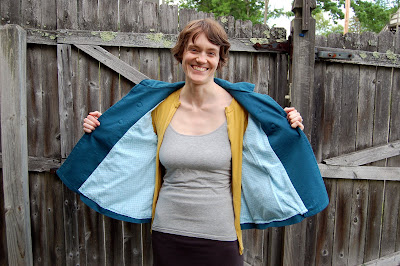
For the lining, I chose a cotton flannel gingham fabric. I really hate being cold and I thought the flannel would be perfect for early spring and late fall weather. I'm laughing in the picture above because I had just asked Matthew if he was taking a picture of my coat or my breasts. This project took me about a month from fabric purchasing to hem finishing (which I was able to do with my blind hem foot, such a great invention). I worked on it an hour here and there when I needed a break from dissertation writing. This has been my largest project with so many outer coat and lining pieces, but so worth it. The only problem has been that I finished it right as the weather started heating up here and haven't been able to wear it outside anywhere.

Here is a preview of my awesome pants! I'll write up a post about them soon.
No comments:
Post a Comment